

Importing Contacts into Dynamics 365 with Company Name Match
Importing contacts into Dynamics 365 is one of the most basic needs for a CRM system. You may have lead lists garnered at a trade show, or exported from an external system or Excel spreadsheet. You may be migrating your data from a legacy CRM system.
In any case, importing contacts into Microsoft Dynamics 365 has two major gotchas to be aware of. First is that we would like to avoid creating duplicate contacts. Second is that we would like to associate the contacts with a parent account to avoid creating orphaned contacts.
Avoiding Duplicate Contacts
Duplicate contacts are an annoyance that can lead to confusion and inefficiency in a CRM system. You may end up with multiple contacts with the same email address, slightly different names, different phone numbers, or different history. And you might not know who’s the rightful owner of that contact. All of these situations are less than ideal.
The out-of-the-box CRM Import Tool doesn’t actually help very much in avoiding creating duplicate contacts. The CRM import tool is designed to insert new contacts, not update existing contacts. It really won’t even look for existing contacts to update. So, if you have existing contacts, you need a way to check to see if the contact already exists before you create it anew.
One duplicate check I like to confirm before I create a new contact is to see if an existing contact exists for the same account. For example, I’ll check on FirstName and LastName, but only deem it a duplicate if we have a FirstName / LastName match within the same company. This would ensure that Ian Smith of SyncraTec would be a different contact record than the Ian Smith who served as the Prime Minister of Rhodesia.
Not Creating Orphaned Contacts
Not creating orphaned contacts should be another objective. When we setup CRM systems, we almost always have some degree of categorization at the account level. With categorization at the account level, you can quickly and easily segment contacts into marketing lists, for example, by the parent account. You would only have to keep track of the categorization for the one parent account as opposed to all the child contacts. Having to maintain data in as few places as possible is always a good idea. But this only works if your contacts have a parent account.
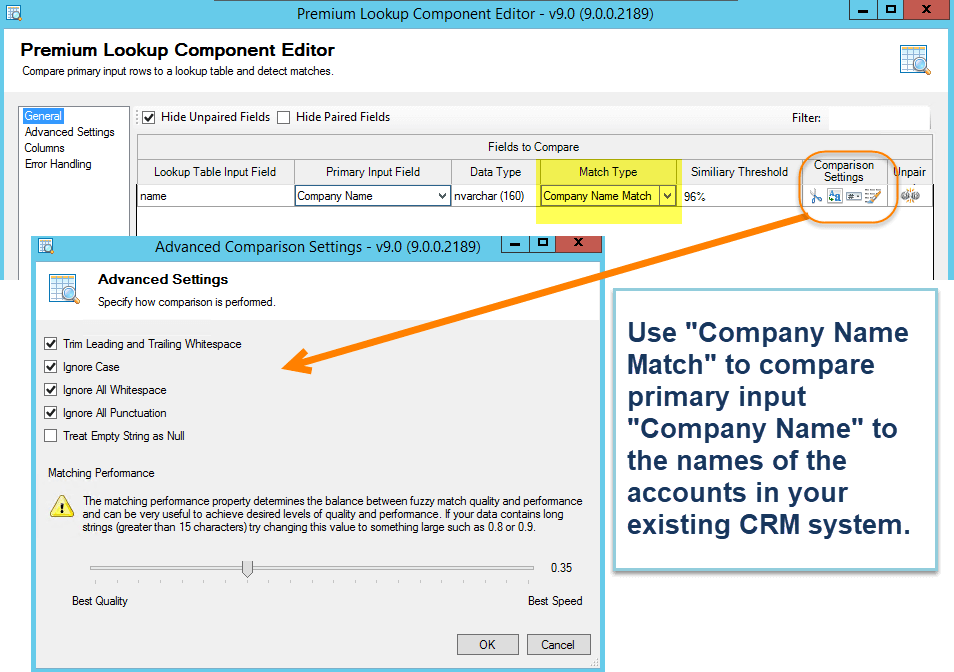
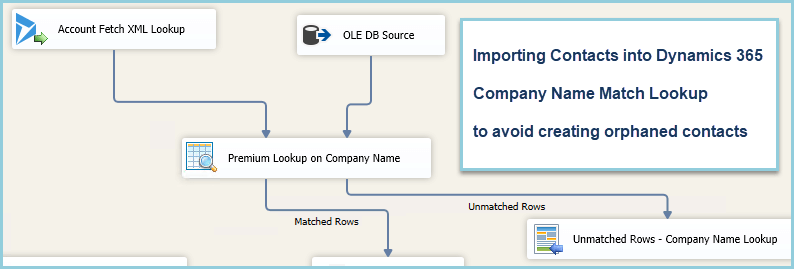
When importing contacts into Dynamics 365, you can avoid creating orphaned contacts by doing a “Company Name Match.” We will show how to use the “Premium Lookup” SSIS component from KingswaySoft in our video demo. The “Premium Lookup” component allows you to do a king of “fuzzy match” on the Company Name. Similarly, we can do a fuzzy match on First Name and Last Name for the contact lookup. The Company Name Match will strip off the common “company type” abbreviations included in company names, like “Inc.,” “Corporation” and “LLC.” Punctuation marks and white-space are also stripped-out from the Company Name. This all happens without any pre-processing and allows you to link your source data company name with accounts in your existing system.
KingswaySoft SSIS Premium Lookup Component
Using the KingswaySoft SSIS Premium Lookup component, we can perform a “Company Name Match.” There are two inputs: the primary data source and the lookup. The lookup can be a Fetch XML query to pull from your existing account data in CRM. You’ll just need the account name and the accountid (GUID).
The important thing is to set the lookup from the input file to lookup for an existing account based on the “Company Name Match” capability.
Then, the Company Name Match portion of your SSIS package would look like this:
Avoid Creating Duplicate Contacts
Similarly, we want to avoid creating duplicates. We can do a FirstName + LastName lookup on the contact, along with the accountid that we did in the first part of the flow. Then we will know if a contact with the same (or similar name) already exists in the system. If the contact already exists, we will just update it with the GUID, which will not actually perform an update because nothing changed (see video). If the contact doesn’t already exist, we go ahead and create it.
Pros and Cons of Importing Contacts into Dynamics 365 with KingswaySoft’s SSIS Premium Lookup Component
First (and only?) con is that you have to have some expertise and resources. You should have some database skills and you’ll need an SSIS environment, with an SQL Server. Having this, the SSIS setup can be a bit challenging the first time around with your Visual Studio and SSIS installation, etc. Once the environment is setup, you just need to install the KingswaySoft SSIS Productivity Pack.
The pro’s are that you can import contacts into your CRM from an external system without creating duplicate or orphaned contacts. Oftentimes (sometimes) you’ll be lucky enough to have an Account Number in the source data that will match-up with an Account Number in your existing CRM system. Barring that or some equivalent, you’re going to be relying on other ways of matching the incoming data with your existing accounts and contacts.
Having a way to match the account name “on-the-fly” (with no pre-processing) will enable you to quickly match (lookup) the accountid based on an account name match (exact match or “company name match”). The “Company Name Match” is the key. The KingswaySoft Premium Lookup SSIS component then becomes a beautiful thing. It allows you to find the account you’re looking for, even if it’s not an exact match on the company name.
Similarly, the First Name Match capability works similarly well for finding existing contacts.
Video Demo of Importing Contacts into Dynamics 365 Customer Engagement with KingswaySoft’s SSIS Company Name Match
The video demo is a quick and simple demo of the few topics we covered in this blog article. We have 25 contacts in an external list (e.g., Excel spreadsheet). We import the Excel file to a SQL Server table, and use that as the primary input. We leave two existing contacts in the CRM system, with five existing accounts. The accounts in the external spreadsheet have different variations of the same company name. The two remaining contacts in the CRM have different variations on the contacts’ first name.

Please check out the video, and leave any comments or questions you may have below.


No comment yet, add your voice below!