Insider Spotlight on Common Data Service Analytics
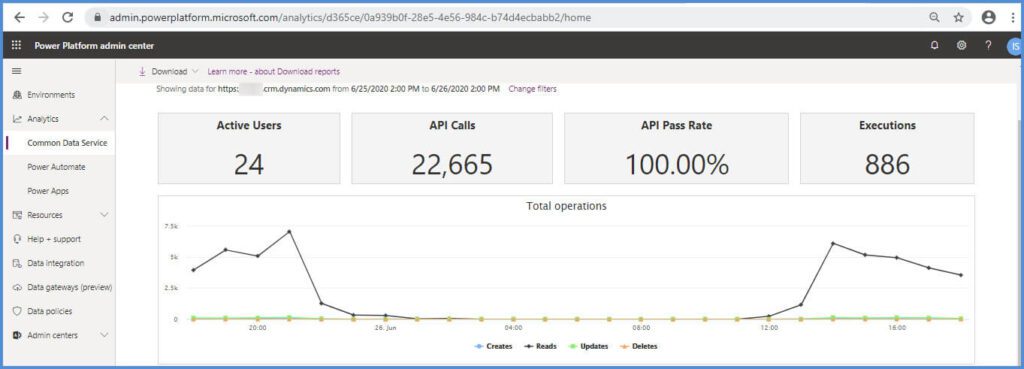
Insider Spotlight on Common Data Service Analytics The common data services analytics found in the Power Platform Administration area replaces the Organization Insights solution that needed to be installed in older versions of Dynamics 365. The Organization Insights solution has now been deprecated. Some high level information on this functionality will be outlined below. Microsoft’s detailed write up can be found here. The below is a screen shot from Microsoft’s documentation on Common Data Service analytics. Where Can I Find the Usage Analytics? Proceed to the URL https://admin.powerplatform.microsoft.com/ and login with the credentials for your organization. Below lists the security roles that users need to have to view the reports. Environment Admin – can view reports for the environments that the admin has access to. Power Platform Service admin – can view reports for all environments. Dynamics 365 Service admin – can view reports for all environments. Microsoft 365 Global admin – can view reports for all environments. Common Data Analytics – Usage Graphs and Charts When you click on Common Data Service, you will be presented with the below open to the Home tab. There are multiple tabs that contain a myriad of Graphs and Charts. Filters The filters can be expanded/decreased to look at a broader or narrower set of data. Please note: It appears at this time that the maximum range for reporting is one month. Common Data Analytics – Usage Reports In addition to the graphs and charts available in the Common data Service area, the underlying data can be downloaded. Below is a screen shot of the reports that are available. Highlight on User Statistics Available Charts If your organization is specifically interested in tracking users and their usage of the system, there are many charts and reports available to help. First, on the Home tab, you can find the below charts. The Active Users tab also contains additional charts reporting on activity as shown below. Excel Reports You can select Download as shown below to list available reports. These reports show the underlying data for some of the charts in the Common Data Analytics. If there is a filter applied for the charts, the same filter is applied to the downloaded reports. As stated above, the maximum duration for data availability is 30 days. Lets export the Most Active Users by Performing Operations report and take a look. The report is exported as a .csv file. The usernames are listed in the first column with the number of creates, updates, deletes and reads. Conclusion Organization insights has been deprecated and replaced with the Common Data Service Analytics area. There are many useful charts and underlying data reports that can be used to do analysis on the usage of your CRM system.
How to Manage Phone Calls in the Unified Interface
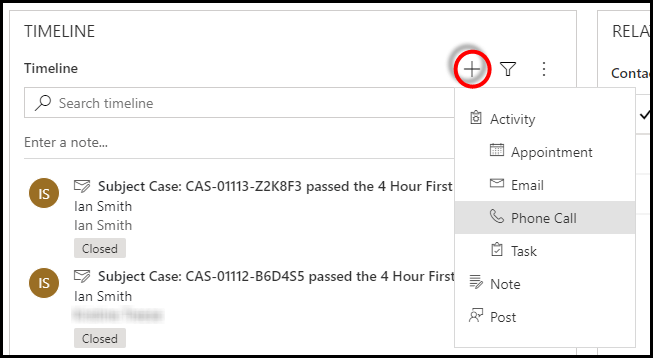
How to Manage Phone Calls in the Unified Interface Dynamics 365 is constantly improving the interactive experience for the sales professional. As a result, there have been some changes in the Dynamics 365 regarding the behavior of Phone Calls. In previous versions, Phone Call records were always marked as “Completed” when they were saved and closed. But, that wasn’t the desired outcome if a user was scheduling a future Phone Call. So, this blog will make a recommendation on how to manage Phone Calls in the Unified Interface. Phone Calls in the Unified Interface Phone Call functionality in the current release of Dynamics 365 is now enhanced. However, there is still some need for improvement when it comes to the Phone Call Quick Create form. I will explain by showing you the difference between the Phone Call Main form and the Phone Call Quick Create form. Phone Call Main Form Create a New Phone Call The Phone Call Main form provides several out of the box options in the command bar. If you are creating a new Phone Call, you will see the following commands at the top of the form: Save – saves the Phone Call record and keeps the form open Mark Complete – saves the Phone Call record as “Completed”, inactivates the record and closes the form Save & Close – saves the Phone Call record as “Open” and closes the form Modify an Existing Phone Call If you want to modify an existing open Phone Call record, the Main form offers several different options. In this case, you will see the following commands at the top of the form: Save – saves the Phone Call record and keeps the form open Mark Complete – saves the Phone Call record as “Completed”, inactivates the record and closes the form Save & Close – saves the Phone Call record, keeps it “Open” and closes the form Close Phone Call – this command will display a pop up window that gives you two options: Close as “Completed” The State drop down value defaults to “Completed” The Status drop down value defaults to “Made” – you can modify it to “Received” Clicking on the Close button – saves the Phone Call record as “Completed” and inactivates the record Close as “Canceled” The State drop down value can be modified to “Canceled” Clicking on the Close button – saves the Phone Call record as “Canceled” and inactivates the record Phone Call Quick Create Form Most people would agree that the Quick Create (particularly for the Activity entities) is the preferred method for adding records. The Quick Create saves clicks and time. It seems to work well and fits into most users’ processes. If you enable the Quick Create form for the Phone Call entity, the system will render the Phone Call Quick Create form: when creating a Phone Call from a related entity Timeline (many of the fields are prepopulated from the related entity, including the “Regarding”) when creating a Phone Call from the “+” icon in the toolbar at the top of the screen The Quick Create form is generated for new Phone Call records only. This form is not rendered by the system when modifying an existing Phone Call record. The Phone Call Quick Create form provides some different out of the box options compared to the Main form. If you are creating a new Phone Call, you will see the following commands at the bottom of the form: Save & Close – saves the Phone Call record as “Open” and closes the form Save & Create New – saves the Phone Call record as “Open” and refreshes the Quick Create form ready for the user to add another new Phone Call So, what is the Problem with the Quick Create Form? Note that the Quick Create does not provide an option to “Mark Complete”. This to me is a big flaw in the otherwise very useful form. Don’t you agree that many users record Phone Calls after they make the calls? Based on that assumption, I have a workaround that will work for most Dynamics 365 users. You can create a workflow that takes the Due date into consideration: A Phone Call record created without the Due date populated is assumed to be a “Completed” Phone Call A Phone Call record created with the Due date populated is assumed to be a future “Open” Phone Call If your users agree to the above, you can write a simple workflow like the one below. This workflow is triggered by the create of a new Phone Call record. This workflow is intended to support the Quick Create form. But, the logic still applies when creating a Phone Call from the Main form. However, there is one caveat with using the Main form. If the user enters a Due date but then selects “Mark Complete”, the system will mark the Phone Call as completed. As a result, if your users want to also use the Main form to create Phone Call records, they should be instructed to always use the “Save & Close” option. This will keep the outcome consistent between the Main form and Quick Create form.
Tips on How to Manage Opportunities in the Unified Interface
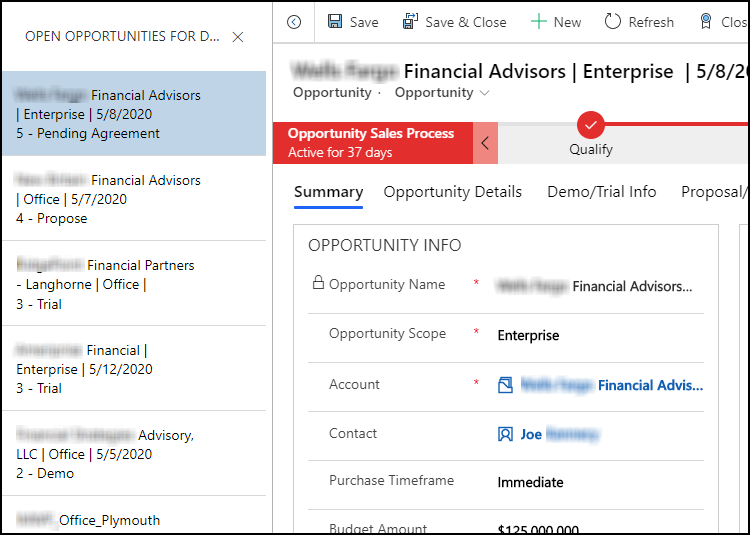
Tips on How to Manage Opportunities in the Unified Interface I am a Dynamics 365 citizen developer consultant supporting multiple clients in all kinds of industries. Most of the business applications we develop are sales apps including, of course, opportunities. Our users dictate how they want their opportunity process and forms designed. However, we still like to offer some recommendations on how to manage their opportunities in the Unified Interface. Record Navigation Panel One of the Unified Interface features that I think is awesome is the record navigation panel. In previous versions of Dynamics 365, a user would click on a record link from a view and the record would open in a form. They would have to go back to the view to click on and open another record of interest. The record navigation panel is a feature of the Unified Interface that can be easy to miss. After clicking on a record from an entity view, select this icon at the top of the form . This will open the record navigation panel, displaying the entity view you just came from. Now the user can select and open other records directly from the record navigation panel. In addition, as the user opens various records, the system will keep the entity form on the same form tab. (Note: This icon was recently updated by Microsoft. It used to be a small right arrow in a circle. The “back arrow”to the left of the new icon is also a recent addition.) Note that the record navigation panel above is displaying opportunity records with the associated Estimated Revenue. This is because the Estimated Revenue field is the first non-key field column in this view. This view is sorted by the Estimated Revenue in descending order, showing the opportunities with the highest Estimated Revenue at the top. The screenshot above shows the record navigation panel displaying opportunity records with the associated business process Active Stage. Again, this is because the Active Stage field is the first non-key field column in this particular view. This view is sorted by the Active Stage in descending order, showing the opportunities that are nearest to closing at the top. Depending on your users’ requirements, various views can be created to support the way they want to monitor their open opportunities. The Opportunity Form and Assistant Microsoft recently updated Dynamics 365 instances with 2020 Release Wave 1. Included in this release is the Sales Insights (free) version. There are multiple components of Sales Insights, but the one I’d like to highlight here is Assistant (previously Relationship Assistant). The Assistant uses AI to keep an eye on your actions and communications. This results in helping you stay on top of your opportunities with insight “cards”. Cards are displayed prominently throughout the application. (For more detail, see Use assistant to guide customer communications.) For opportunities, the Assistant can provide insight into advancing your opportunity. The Assistant section may be on the opportunity form by default. If not, it should be added to a prominent position on the form. The Assistant card displayed above is notifying the opportunity owner that the Estimated Close Date for this opportunity is approaching. As stated previously, these cards are available out of the box for free with Dynamics 365 Sales. An administrator can configure insight cards such as task due today, close date has passed, or email contains a new stakeholder. Pin the Business Process Flow Stage Flyout Most Dynamics users have processes in mind that their sales team should follow to improve results. You can map their specific sales processes into the opportunity Business Process Flow (BPF). A BPF is a guided process map, like a wizard that moves their sales team from one stage of the sales process to the next. A citizen developer can configure the steps required to reflect the standard sales process. The Unified Interface saved some screen real estate by removing the constant display of the BPF steps seen in previous versions. Now, you need to click the process stage in the BPF bar to see the steps for that stage in a flyout window. You also have the option to pin the flyout window to your form by clicking on the icon in the upper right corner. (See the results of pinning the stage flyout in the Putting It All Together section below.) The fly-out window remains in place if you switch to a different record. If you click on a different process stage, the flyout window will update automatically with the appropriate steps. If you close the fly-out window, it will remain closed on subsequent records until you decide to pin it again. A Few Other Opportunity Tips A few years ago, Microsoft redesigned the way entity records were associated with Business Process Flows. The active process stage used to be an out of the box field on, for example, the opportunity record. As most of you already know, this is no longer the case. Instead, each Business Process Flow is represented by it’s own BPF entity. Now, the active process stage of an opportunity is stored on the related BPF entity record. Therefore, you cannot display the active process stage value on opportunity forms or in opportunity views. As a workaround, I recommend adding some custom fields to the opportunity entity record. All of these custom fields can be updated in one workflow that is triggered by the change in the Active Stage field on the related BPF entity record. Active Stage I suggest adding a custom Active Stage field to the opportunity entity record. You can make this field a text field or an option set field. The workflow can set the value of this custom field based on the value of the Active Stage field on the related BPF record. This custom field can be added to views and charts to identify where your opportunities are in the selling process. It is also a good idea to prefix the Active Stage name with
Insider Spotlight on Scanning a Business Card to Dynamics 365
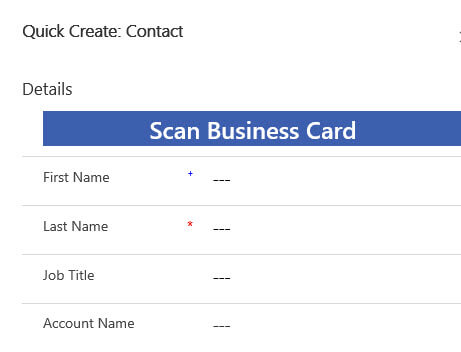
Insider Spotlight on Scanning a Business Card to Dynamics 365 Scanning a business card to Dynamics 365 to directly create a Contact or Lead is a much awaited piece of functionality. When you collect a business card at a meeting or conference, the information on the card can now be captured. This can be done quickly and efficiently with the new feature. In this blog, detailed steps required for this to work will be explained. Scanning a Business Card to Dynamics 365 License and Permissions The first thing to know is that the Dynamics 365 scanning a business card functionality is only available in the Unified Interface. The Microsoft guide details the steps to take in the setup. The first step is to go to the Sales Hub, Overview area and choose to manage the Business Card Scan. Turn the setting on for the organization. We recently set the Scan Business Card functionality for a client. While we were testing the functionality, the following error was received. The issue was with the user license. A user needs to have a Sales Enterprise license to use this functionality! Below is a screen shot from the 2020 Dynamics 365 Licensing Guide. 10 Scans/user/month is included with a Sales Enterprise License. Update: after adding the professional license for the user, the scan business card functionality still did not function. We needed to call MS support to allocate the AI builder units. This is a process that only happens once a week and we added the license mid-week. Using the Quick Create Form to Add a Contact or a Lead The Quick Create form can be used on a desktop or the mobile app to capture the image of a business card. The fields from the business card are mapped to fields on a Contact or a Lead. If you’re using the Dynamics 365 Sales app on a desktop, the business card picture file should be selected. If you are using a mobile phone or other mobile device, use the mobile phone camera to capture the business card picture. First name, last name, account name, job title, email and address information will be automatically populated from the business card image. Modifying the Fields Included on the Business Card Capture. You are able to modify the fields that are captured from the Scan Business card functionality. Go to the Controls tab of the Business card area field properties of the Contact/Lead Quick Create form. The captured fields are defined. If you would like to capture the Company Name from the business card; you can do that. However, you would need to capture that field in a text field and not in the Parent Account lookup field on the Contact record. The Parent account lookup field can then be populated manually from the text field. Saving the Business Card Image in Dynamics 365 The image can be saved on the Contact record. The setting for allowing that capability is described here. The image of the business card is saved in a section/tab of the form when this setting is turned on. Conclusion As described above, the scanning a business card to Dynamics 365 is functionality that greatly enhances the productivity for Sales users of Dynamics 365. The free version of Sales Insights is also included with this license and is detailed in SyncraTec’s Insider Spotlight on Using Dynamics 365 Sales Insights blog.
Insider Spotlight on using Dynamics 365 Sales Insights
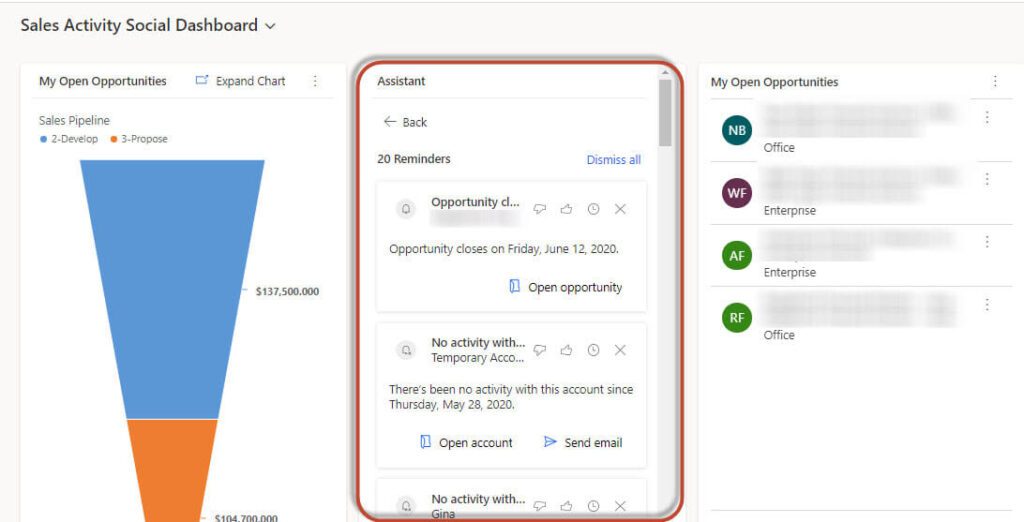
Insider Spotlight on Using Dynamics 365 Sales Insights This blog will give you an insider look at the Dynamics 365 Sales Insights (free) version. Our clients’ Dynamics 365 instances were recently updated with 2020 Release Wave 1. We took a look at the Dynamics 365 Sales Insights (free) configuration after the upgrade. Some of our findings are detailed below. The configuration for these components can now be found in the Sales Insights area in the Sales Hub app. The detailed steps can be found in the Enable and configure free Sales Insights features Guide. Please note: The features are configured in the Sales Hub area but are available in the other out of the box apps and even custom apps! Email Engagement in the Sales Insights Free Version The email engagement part of the Sales Insight free version helps you create more effective email messages—and learn how your contacts are interacting with them. Stay on top of your email and prioritize those prospects or customers that are most engaged. For more detail, see Use email engagement to view message interactions. Email Engagement allows for tracking of interactions with an email and its attachments. In our organization, the free version of Email Engagement was configured and turned on before 2020 Release Wave 1 was applied. The mailboxes for the users were configured with Exchange Server Side Synchronization to allow the successful sending and receiving of emails. Th feature was turned on. After the upgrade, the feature had been reset and needed to be turned on again. After configuration,the new section shown below is now included on the “Email” form. Note: This section is not shown on the Email for Interactive or the Enhanced Email forms. Recipient Activity Will Be Followed The option will automatically be turned on. When you choose to allow the email to be followed, statistics from the email will then show on the email in the Recipient Activity section. Note: There is some additional setup you will need to do to track attachments. One Drive for Business needs to be enabled. SharePoint needs to be enabled first in order to enable One Drive for Business. In addition, the email entity needs to be configured for document management. Schedule the email to be sent at a later time This works exactly as described. Emails can be scheduled to be sent at a later time. This way emails can be created and then sent later. A specific date and time can be specified. Set a reminder to follow up on this email A reminder can be set for follow up on an email. See below for the conditions that are available. If the condition is met, the reminder shows on the email recipient’s CRM record or in the Sales Activity Social Dashboard. Auto Capture in the Sales Insights Free Version Dynamics 365 Sales Insights auto capture analyzes your email messages directly in Microsoft Exchange to find all messages that might be relevant to your work in sales. The application looks for messages to or from relevant email addresses and presents you with the relevant messages right in Sales. To learn more, see Auto capture of related emails. Auto Capture Configuration Auto capture is setup in the Sales Insight area of the Sales Hub. It assumes that Exchange Server Side Synchronization is setup along with the user’s email being approved and the mailbox configured. Auto capture can be controlled at the User level. The option to configure this can be found on the Email tab of the Personal Options. It is defaulted to “ON” (once the user’s mailbox is configured) and can be turned off with this option. Auto Capture on the Timeline When the feature is fully configured, untracked emails will begin to show in the Timeline of the associated record. The user can then choose to track the email, in which case, the email will be viewable to all users. Post 2020 Release Wave 1 Finding Before the 2020 Release Wave 1 was rolled out to our organization, the mailboxes were configured properly . Afterwards for the untracked emails to start showing again, we needed to approve the user’s email and test and enable their mailbox again. We approved the user’s Primary Emails. The mailboxes were then tested and enabled. Assistant (Formerly known as Relationship Assistant) The assistant (formerly known as Relationship assistant) combines and analyzes the information that is at its disposal from Dynamics 365 Sales, and then generates a collection of action cards. These cards are displayed as the entry point to Dynamics 365 Sales on mobile devices, and as a carousel or column display on web-based dashboards. For more detail, see Use assistant to guide customer communications. Assistant uses Artificial Intelligence to show contextual insights to salespeople. It provides insight into relationships with customers and prospects. Assistant is composed of “cards.” The cards each highlight an interaction with a customer. “Action Cards” can be seen in multiple places in the system. Where Do Action Cards Show? We see “cards” in several places in Dynamics 365, including on entity forms, dashboards and directly in the Assistant. The Assistant section on the Opportunity form shown below is approaching the estimated close date of the Opportunity. The assistant cards show on Dashboards. The “action cards” are also displayed when you click on the “light bulb” icon. Conclusion As described above, Microsoft has expanded the free Sales Insights offerings included with the Microsoft Dynamics 365 product. All of these features are designed to assist a salesperson in helping to improve the efficiency in which they conduct their job responsibilities. We look forward to the additional capabilities that Microsoft will introduce next.
Energize Your Emails with the Dynamics 365 Enhanced Email Experience
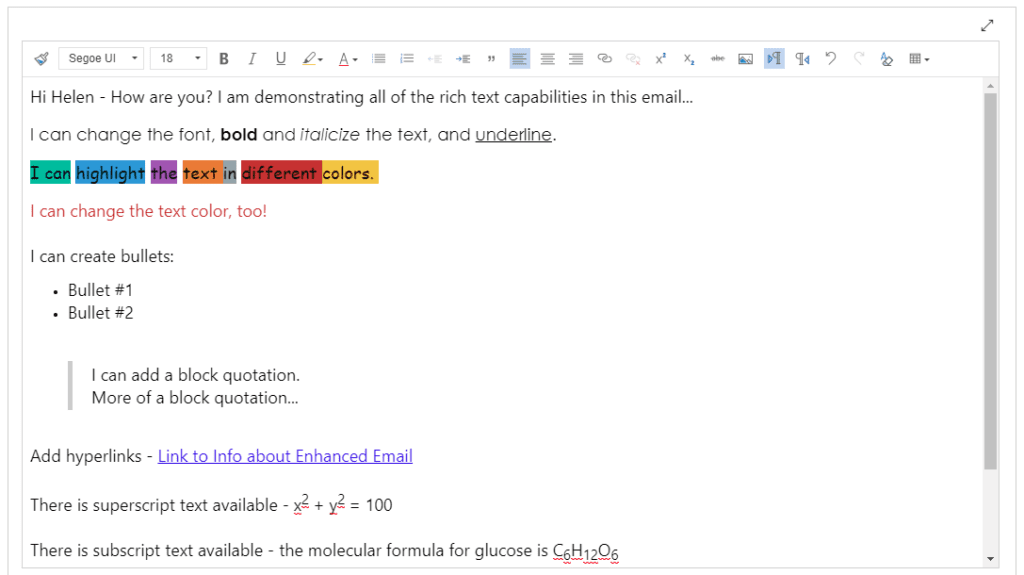
The Dynamics 365 Enhanced Email Experience Dynamics 365 Enhanced Email Experience is a major improvement for composing emails. In this blog, I’m going to highlight the details behind the new and improved components of the 2020 Release Wave 1 Enhanced Email Experience. This feature is available in model-driven apps in the Unified Interface. It must be configured by the system administrator. Let’s see how this enhancement can facilitate multi-tasking and increase your productivity. To get started, from an entity Timeline, click on the “+” and select “Email”. (Note: Composing an email from the Timeline is the only way to get to the new enhanced email experience.) Enhanced Email Experience – Non-blocking “Compose” Window The first noticeable change with the enhanced email experience is the non-blocking window that opens. It allows you to compose your draft email with the context of the entity record you are working on. You can leave the window “normalized”, which allows you to view relevant content at a glance while you compose your email. By clicking on the icons in the upper right corner, you have options to “minimize” or “maximize” the form . For example, below is a New Email form from an Opportunity record. The non-blocking window gives you access to the relevant Opportunity content and related entity content. The “Compose” draft email window will stay open as you navigate to related entities. This feature facilitates the ability to copy and paste pertinent information into your email body. In addition, you can have multiple active draft emails open simultaneously. Enhanced Email Experience – Rich Text Editor To access all of the rich text editing options, click on the double arrow in the upper right corner of the email body section. These rich text options will allow you to make your message more meaningful and eye-catching. Instead of listing all of the rich text components, I created a draft email that demonstrates most of what is available: Enhanced Email Experience – Email Template Selection Email templates are available by selecting the “Insert Template” button at the top of the “Compose” form. This includes out of the box templates and custom templates. In the example on the left, my email had a contact and an account in the “To:” field. The enhanced email experience prompts you to select the record you want a template for. Because I selected the contact, Mary Admin, the system displays a list of templates associated with the contact entity. The screenshot below displays the window of all the available email templates. In this case, they are all out of the box email templates. As the user clicks on them, they can be previewed on the right side. If you select the blue down arrow, you see a description of the email template along with the date it was created and who created it. From here, an email template can be selected and applied to the email you are composing. If configured as such, entity record fields will be automatically mapped to the email body. Dynamics 365 Enhanced Email Experience – Email Signatures and Attachments You can further customize your email by adding a saved signature. Simply select the “Insert Signature” button at the top of the “Compose” form. A window pops open that allows you to search for the signature you want to include. The “Attach File” command button is used to attach documents and other files. You won’t see the “Attach File” button until the email has been saved at least one time. The steps to attach a file are the same as they were in previous releases. Final Steps The screenshot on the left shows two minimized draft emails. They appear like this in the lower left corner of your screen. You can click on the icons to “normalize” their view or “maximize” their view. After you have finished composing your draft email and you are ready to send it, select “Save” at the top of the form one more time. You actually won’t see a “Send” button until the email has been saved at least one time. However, you don’t have to send it. You can “Save & Close” the draft email to send at another time. Setting up the Dynamics 365 Enhanced Email Experience The system admin can configure the enhanced email experience from the Sales Hub App Settings area. However, this will enable the enhanced email experience in all of your model-driven apps. Note that the system admin can also go to the legacy web client Settings area. The Microsoft web page provides the detailed step by step instructions. Here is a link – Link to Microsoft Documentation.
Interactive Dashboard Fun in Dynamics 365
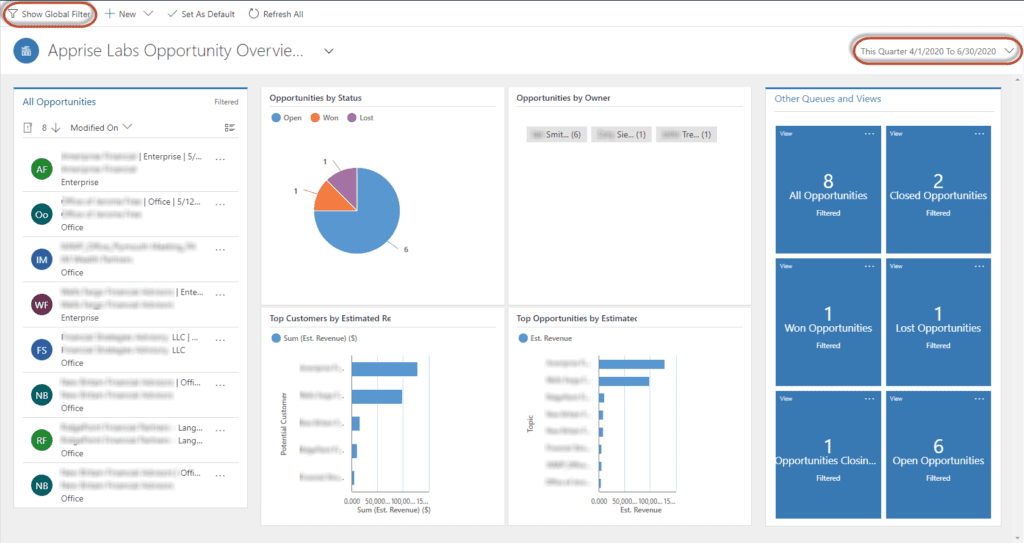
Why configure Dynamics 365 Interactive Dashboards? I look forward to the opportunity to create an Interactive Dashboard in Dynamics 365. Although they are quickly and easily configured, they look and perform like they took hours of our time! Admittedly, you won’t be able to provide the flexibility and functionality of a Power BI dashboard, but those features aren’t always required. The out of the box capabilities of interactive dashboards are often enough to provide great value. Even if your users don’t request an interactive dashboard, throw one together to demonstrate the power of Dynamics 365. Now that I have created a variety of interactive dashboards for a variety of industries, I have a few of my own personal best practices that I’d like to share. Templates to get you started with Interactive Dashboards To create a new interactive dashboard, from a solution, select Dashboards on the left. Go to the New button dropdown list and select “Interactive experience dashboard”. There are multiple templates available in to get you started with your interactive dashboards. The multi-stream dashboards display real-time data over multiple data streams, which are simply views. Each stream or view can be based on a different entity. The single-stream dashboards display real-time data over one stream or view. Both multi-stream dashboards and single-stream dashboards display charts that also function as data filters. For the purpose of this blog, I’m going to concentrate on single-stream dashboards. Interactive Dashboards for Opportunities Most companies obviously pay close attention to the status of their sales opportunities. Interactive dashboards are a perfect tool for them to accomplish that. I recommend creating an “overview” interactive dashboard for all opportunities. Another interactive dashboard can be configured to do analysis on just the open opportunities. Because the data categories of interest will most likely be different for each group of opportunities, you can develop a unique and optimum design for each dashboard. In this blog, we will dig into the details behind the “overview” type of dashboard. Opportunity Overview Dashboard For the “overview” type of dashboards, I always choose one of the 5-Column Overview Dashboard templates. (The dashboard being featured in this blog is using the 5-Column Overview Dashboard II template.) After the dashboard form opens, give your dashboard a meaningful name and select the Filter Entity. Next, you need to select the Filter By date. You have the option to choose any of the Filter Entity date fields. In most cases, the Created On date works well. The Filter By date is the primary date filter and the date used by the selected default Time Frame. There are lots of choices for the default Time Frame (e.g. Last week, This month, Month To Date), but I like to use “This quarter”. Streams and Charts I recommend using the entity view that lists “All” entity records as the one stream or view that will be displayed in this dashboard – in this case, All Opportunities. Now you need to think about the charts you want to use as filters. There may be one or more out of the box charts you can use. In the example below, Top Customers by Estimated Revenue and Top Opportunities by Estimated Revenue are both out of the box charts. The charts that I consider to be standard on an “overview” dashboard are the “by Status” and “by Owner” charts. You can configure them to be one of many different chart types. If you want to add a fifth chart, select the 5-Column Overview Dashboard template. I think a pie chart works well for Opportunities by Status. Or, you may find more value in Opportunities by Status Reason. Our users had 12 Status Reasons defined, which I thought would be too many for a filter chart. So instead, I made Status Reason a Global Filter. More about Global Filters later in the blog. Tag charts are relatively new in Dynamics 365. I like to use a tag chart for Opportunities by Owner. Option Set Color Codes If you create some custom charts based on an option set field, remember to configure your option set values with different colors. I think an interactive dashboard that has some color is more appealing and makes it easier to use. If you google this, you will find that in data visualizations, the importance of color is not just aesthetics – it also conveys meaning. You could make your color selections a project in itself! But, I just google “HTML color codes” to find the color codes that I think are appropriate for my chart. You simply type, or copy and paste, the color code into the option set value Color field. Tiles The tiles, which are also based on views, are the dark blue boxes positioned on the right side of the dashboard. Each tile offers a count of the opportunities within that view. This is great for a quick overview of how many opportunities are in each category. For Opportunities, there are many out of the box views to choose from. I will show you how tiles work later in the blog. Save and Publish When you are satisfied with your configuration and are ready to test it out, click on SAVE at the top and close the dashboard form. If you are adding it to a model-driven app, you may need to add the dashboard to your app and publish it. Next, publish your solution and test out your new interactive dashboard. Check Out Your Interactive Dashboard Navigate to Dashboards and open your new interactive dashboard to check it out. This particular dashboard is using test data, but you could imagine how it would look with a lot more data. Time Frame It is important for users to understand that the interactive dashboard opens using the selected default time frame. If the user clicks on the down arrow next to the default Time Frame, they will see many other out of the box options for the date filter. “Created On” is displayed at
Dynamics 365 Service Level Agreements Demystified
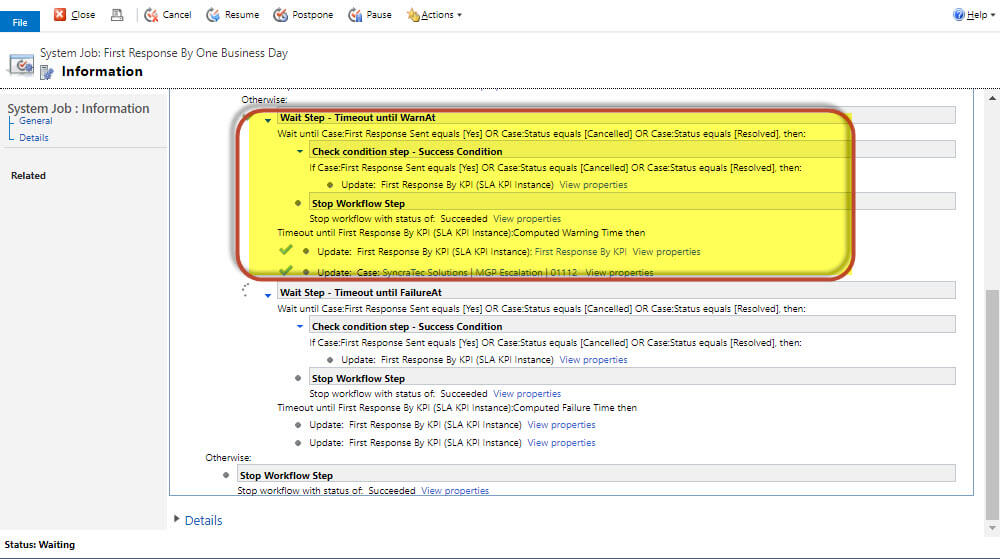
Dynamics 365 Service Level Agreements Setup Dynamics 365 Service Level Agreements allow case managers to setup criteria upon which to monitor and analyze the case response time across their organizations. These criteria can include things like first response and case resolution time. A first response Service Level Agreement was setup at a client’s request to ensure that all cases are initially responded to within one business day. This Service Level Agreement monitors a Customer Service Rep’s initial response to a case. Microsoft provides helpful documentation on setting up a Dynamics 365 Service Level Agreement. You can find that documentation here. Issue with Email Warning NOT being delivered Next, I proceeded to configure the Service Level Agreement. Triggering a warning can be set for when a threshold is met. In this instance, an email reminder is sent if the Customer Service Rep (CSR) assigned to the Case does not respond within four hours. Note: The elapsed hours calculation automatically takes into consideration the Business Hours configured. The other warning actions that can be configured are: Create record, Update record, Change status and Assign record. I discovered that the email created in the Warning Actions part of the configuration was not being sent! After reviewing the configuration, I determined it was being done correctly and was not the source of the issue. Dynamics 365 Service Level Agreements Workflow Discovered The warning email was configured to be sent out if four hours had elapsed and the first response had not been initiated. However, the email message was not being created. While troubleshooting, I discovered an automatically generated background workflow running on the Case record that originated at the time of Case creation. This workflow was managing the Dynamics 365 Service Level Agreement processing that had been configured. Hence, the “First Response By” name of the workflow. I reviewed the workflow in order to determine what was preventing the warning email from being sent. Please note: The workflow displayed below now includes an update to the case record. It initially was creating and sending an email to the Customer Service Rep. In order to facilitate creating charts and dashboards regarding the SLA results, I decided subsequently to include a custom field on the Case to house the SLA Status. This information is tracked on the SLA KPI Instance records that are attached to the case and NOT ON THE CASE ITSELF. This is the reason for adding the custom status field. When an SLA is applied to a case, one SLA KPI Instance record is created (for each SLA Item attached to the applied SLA) and attached to the case. The lookup fields configured in the SLA KPI related to the SLA will be populated with the newly created SLA KPI Instance records. The SLA KPI Instance records track information for each related SLA item: status, failure time, warning time and succeeded on time. First Response Workflow Dissected The workflow is monitoring the state of the Case to determine if it has passed the service level agreement criteria that has been setup and updating the associated SLA KPI instance accordingly. The first Wait Step is highlighted in the workflow shown below. This step is waiting until the First Response sent equals Yes, the Case Status is Cancelled or Resolved. In these instances, it sets the SLA KPI Status to Succeeded. It will timeout when the computed warning time ( 4 hours past the created on date of the case) is reached. At that time, the SLA KPI Instance will be updated with an “approaching non-compliance” status and update the case accordingly. The original configuration I had setup had an email being sent from the CSR manager. The issue was that the CSR manager user was not configured to allow users to send emails in their behalf. As a result, the processing in the workflow stopped with an error and the email was never sent. It also never got to the second wait statement. The second part of the workflow shown highlighted below is waiting again until the Case Status is Cancelled or Resolved. The SLA KPI Status is then set to “Succeeded”. When the computed failure time (which in this case is one Business day ) is reached, it will timeout. The SLA KPI Instance will be updated with a “Non-compliant” status. I hope this blog was informative and aids in any SLA troubleshooting you might need to do.
Boost the Timeline with Dynamics 365 Custom Activities
Why use Dynamics 365 Custom Activities? The Unified Interface Timeline was a nice addition to Dynamics 365. It was a big improvement over the old Activities and Notes control. Out of the box, the system captures interactions and communications around the usual activities like Phone Calls, Tasks, Appointments, Emails and Notes. But suppose a user would like the Timeline to reflect an activity that falls outside of these common interactions? We had two clients make a request like this. One client wanted to see the ClickDimensions Sent Emails that were sent to their Contacts. And, another client wanted a general “Made Contact” activity. The “Made Contact” could be a conversation at a trade show or a discussion at an industry golf outing. Dynamics 365 custom activities to the rescue! Creating Dynamics 365 Custom Activities We create a custom activity entity just like any other custom entity. However, you need to be sure to click on the “Define as an activity entity” checkbox. After your new Dynamics 365 custom activity is saved, you can go to the Entity Definition and open the “Update Icons” tab displayed at the top. There are loads of icons available on the web – some are free. Dynamics 365 recommends using a *.svg file type icon. Our Cyber Charter School Client Our cyber charter school client uses ClickDimensions Campaign Automations to send two different types of emails to their prospective parent/guardian leads. Some are personalized emails containing required enrollment document links and others are marketing brochure type emails. But, those of us that work with ClickDimensions know that a Sent Email does not result in the creation of a Dynamics Email activity. Therefore, it is not reflected in the Timeline. As a workaround, we created a new Dynamics 365 custom activity record called “Follow Up Email.” We found a free *.svg “envelope” icon on the web and uploaded it. However, we were sure to choose one that looks different from the out of the box Email activity icon. Dynamics 365 creates a custom activity entity record with multiple out of the box fields. For this client, we added one new custom field to capture the ClickDimensions Email Template name. The next step was to configure a workflow that is triggered by the creation of a ClickDimensions Sent Email record. This workflow generates the custom activity record by mapping the following field values from the Click Dimensions Sent Email record: Related contact is mapped to the Follow Up Email activity Regarding field Subject is mapped to the Follow Up Email activity Subject field Email Template is mapped to the Follow Up Email activity Email Template field (Email Templates should be given meaningful names) The last step of the workflow is to update the Activity Status to “Completed”. The final result is a Follow Up Email activity looks like this in the Timeline: Our Chemical Company Client The sales team from our chemical company client spend a lot of time meeting people at trade shows and other industry events. Therefore, they needed a generic “Made Contact” custom activity. This would be something they could use when the contact made does not fit into a Phone Call, Appointment or Email. We configured the Subject on the Made Contact form to be prepopulated with “Made Contact.” This allows the user to append someone’s name or an event name. In addition, they can enter a description of the interaction in the out of the box Description field. This client requested a “handshake” icon for their custom activity. We were able to satisfy this business requirement in literally less than an hour by utilizing the power of a custom Activity. Here is an example of how the Made Contact activity looks in the Timeline: Next time you are contemplating a solution for tracking an activity that doesn’t quite fit into the out the box activity offerings, don’t forget about Dynamics 365 custom activities. They are very simple to configure and could potentially fill in some of those gaps in your Timeline.
Beware Dynamics 365 Storage Cost Increase
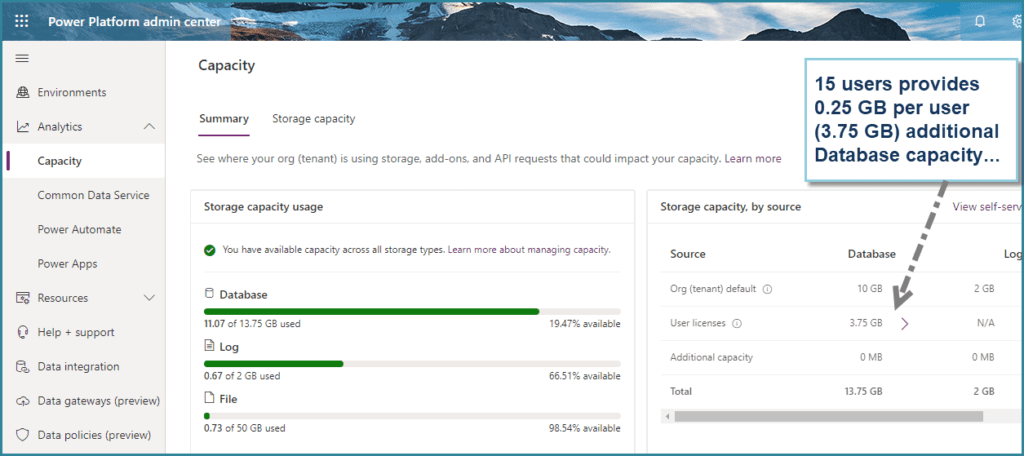
Latest Customer Engagement Licensing Change Could Lead to Dynamics 365 Storage Cost Increase With the latest Dynamics 365 licensing changes (see Dynamics 365 Licensing Guide – April, 2020), there’s one change that small business owners and IT administrators should be aware of. If you’re running Microsoft Dynamics 365 Customer Engagement (CRM), then you need to be aware that the data storage model is changing, and could potentially lead to a Dynamics 365 Storage Cost Increase. Where to Look to Identify Biggest Data Storage Offenders The first place to look to see if you may be impacted is the Power Platform Admin Center. Just navigate to https://admin.powerplatform.microsoft.com and look at the summarized storage capacity usage. Note that the storage capacity summary shows how much data storage is used by all the environments in the tenant. The storage capacity is broken down by Database, Log, and File type. Database is your actual data, Log is your audit logs, and File is file attachments. Until this change, a lot of third-party add-ins were geared towards reducing the amount of space used by file attachments in your CRM system. It is hardly necessary to worry about files saved in your CRM system now, because you’ll have 20 GB for the tenant to start, and an additional 2GB for each full-licensed user. So, if you have 15 users, you’ll have 50GB of file storage — more than enough for most user environments. However the Database Storage metric is more likely to be over the available capacity. You get 10GB for the tenant, and an incremental 0.25GB for each full-licensed user. As shown on the capacity summary image above, you can see that 10GB + 15 users x 0.25GB = 13.75GB. And you can see that we’re using 11.07 out of 13.75GB. Again note, this is the summary page and measures across all your environments (e.g., your Production plus your Test environments). The screenshot below shows the breakdown by environment (or organization). Impact of Dynamics 365 Storage Costs Increase Here we can start to get an idea of the impact of the Dynamics 365 Storage Costs Increase, if you have a few years of data, and a full-copy test environment, you may be over your allotted capacity for the CDS Database Capacity metric. Under the previous licensing, you could buy additional capacity for $5 / GB per month. Now it’s $40 / GB per month. type of storage capacity Included Capacity Incremental Capacity for Each Full-Licensed User Additional Storage Cost CDS Database Capacity (e.g., relational database data) 10GB 250MB / user $40 / GB per month CDS File Capacity (e.g., file attachments) 20GB 2GB / user $2 / GB per month CDS Service Log Capacity (e.g., audit logs) 2GB none $10 / GB per month Dynamics 365 Storage Costs Increase Mitigation There are two places to look to see what could be major factors impacting your CDS database usage. First, look to see if you have multiple environments with equivalent database sizes. If you have a test or demo environment of equal size to production, chances are you can pare that down. Rarely does the test environment need to have all the historical data that the production environment has. In our example, above, you can see that we have 4.66GB in prod, 3.1 GB in the demo environment, and 1.13GB in our Test environment. If you don’t need a test, demo, or training environment, then these environments can be deleted to free up capacity. If you do need them, you still have options. What Tables are Using the Most Storage Capacity? From the screenshot, below, you can see the top ten tables that are using up database capacity. As indicated in the graphic, there are a few tables that you may not be able to do anything about. If you have managed solutions that you’ve imported, and are still using, you won’t be able to delete data from, or reduce the size of those tables. (Though, if you don’t need those solutions in your test environment, you can delete them from there.) A good place to start is to download all the tables data, showing which tables are using the most data – from biggest to smallest. The table names listed are what are called schema names or logical names, as opposed to the friendly display name of the table. You can get more information about the specific tables via either the Metadata Browser or the Metadata Documentation Generator using the XrmToolBox. Backup Essential Data to Long-Term Storage, then Delete Older Data Once you identify the tables taking up the most space, you can get to work reducing the data size. If the data is non-essential, you can run bulk delete jobs now, and schedule recurring bulk delete jobs to periodically delete the data to keep it in check. Another strategy would be to delete just the older data. For example, customer support cases could be deleted if they’re older than one year old. Maybe there are certain types of customer support calls that can be deleted, but you definitely want an archive in case you ever need to refer back to them. In this case, we can “save-off” a copy of your CRM data to an Azure SQL Database. Then you can configure the database with a long-term retention backup policy (LTR) to automatically retain the database backups in separate Azure Blob storage containers for up to 10 years for the Azure SQL Database. Unexpectedly Large Web Resources Table We had a recent case with a client, where they have a Dynamics 365 Customer Engagement Plan license, and had all the major apps installed; like Sales, Customer Service, Project Service Automation, and Field Service. We noticed that the database size increased dramatically overnight, and this was because of the Web Resources table, which is where the size of the solutions files would show in the database. After a call with Microsoft, we were advised that there was a “technical glitch” — that happened around